Saturday, April 21, 2012

Wrap it Up With a Bow - Making a Registry Gift Personal


It's wedding season and with every wedding comes bridal showers! I've always enjoyed picking out gifts for friends, but for bridal and baby showers its best to follow the registry.

Registry gifts can be, let's face it, boring! There is nothing sexy about pots, pans, or bath towels, but I always like to add something to a gift to make it more personal. The gift wrapping is the easiest way to add color and "flare" that will make your's stand out in a sea of boxes from Bed Bath and Beyond!

I always keep the basics for a decent wrap job on hand at home. This includes neutral, solid and/or pattern wrapping paper and a variety or ribbon. Multiple colors are good to have to that you can match your gift to the color scheme of the shower or wedding.

I also make regular visits to my local crafts store to pick up items that make the gift wrap more personal. I look for monogrammed pieces (see images below), seasonal accents (i.e. real or fake flowers, decorative insects, pearls, bows, baby rattles, decorate wedding pieces such as enlarged engagement rings, wedding bells, toy cakes, etc.) Get creative and think about the guest of honor's interests.

Just this weekend I had two wedding showers for two of my dearest friends. Knowing that the showers would be wonderful, I wanted to make sure U brought gifts to match!

Below are the two gifts that I wrapped!
The first was for my friends, Jamie. She has such an amazing personality and is so feminine, so with that and a pink floral invitation, I wanted her gift to be whimsical and spring-like!

I picked up some monogrammed stationary based on the bride's soon-to-be new last name. In this case,  Jamie's fiance's last name starts with an "R". I used one of the cards from the stationary as my card for the gift and left her the others to keep. I also used an "R" stamp to stamp the card and also gave this to the bride to use for the future.


The other shower was for my one of my best friends, Stephanie! I'm standing up in the wedding, so I wanted to make sure she knew I put a lot of thought into her gift. The invitations for the shower were black, white, and green and matched perfectly with Stephanie wedding colors and her artist and creative taste! Stephanie is edgy but still has an appreciation for the simple things in life!


The gifts were a hit among all the ladies and were also a perfect addition to the ribbon bouquet that is created at the shower by the bridesmaids for the rehearsal dinner!

Happy Hobbying,


The Self Proclaimed, Modern Day Renaissance Woman


Tuesday, April 17, 2012

DIY - Bride and Groom Chocolate Covered Oreos

As mentioned in my previous Mason Jar post, I had to pull out all the stops for my Sister's bridal shower! I thought and thought about a decent party favor the guests won't throw away the minute they get home!
My trusty neighbor sent over a link from Etsy that displayed the "cute as a baby's bottom" favor that I was looking for...bride and groom chocolate covered Oreos!


Being the Renaissance Woman that I am, rather than paying $3.25 a piece (x55 guests, tax, and shipping...no thank you) I put myself up for the challenge and made them myself!

Here it goes...you will need:
  • 4 boxes of Oreos
  • 3 bags of semi-sweet chocolate chips
  • 3 bags of white chocolate chips
  • Edible pearls (found at a craft store)
  • A dash of canola oil or Crisco
  • Parchment paper
  • 2 ziplock plastic bags
  • Plastic favor bags (found at a craft store)
  • Thin ribbon to match your wedding colors
  • Lots of patience
  • 1 Masseuse
  
1. Melt 1 bag of white chocolate in glass bowl in the microwave in 30 second intervals. Add a dash of canola oil if you notice the chocolate thickening. Usually 3 intervals is enough depending on the power of your microwave.

2. Once melted, dip one Oreo at a time face down, submerging all but one face. To smooth the coated face of the cookie, slide up the side of the bowl to get a flat edge. Place on parchment paper and do the same with half of your Oreos.

3. Dip a knife if the melted chocolate a sprinkle over Oreo in straight lines, creating a "v-neck" shaped dress.


4. While white cookies are drying place 5 edibles pearls in a "u-shape", creating the look of a necklace.


5. Repeat step 1 with the semi-sweet chocolate. Now you should have about 60 white Oreos and 60 semi-sweet.

6. Once the semi-sweet has dried, melt 1/2 a bag of white chocolate (see step 1) and the melted white chocolate in a plastic bag. Squeeze bag until chocolate is in one corner of the bag and cut very small hole in the corner. This creates a homemade decorating bag.

7. Squeeze white chocolate onto the semi-sweet Oreo in the shape of a triangle on the top-center. Let dry.

8. Repeat step 6 with semi-sweet chocolate

9. Create little buttons and a bow tie on the white triangle you created in step 7. I mentioned in the "ingredients" section that you will need patience and a masseuse. This is why...this step as well as step 7 take some time and focus. Be sure the stretch your neck after this portion...no joke :) I guess this is why people pay others to do this for them :P


10. Let dry

11. Carefully place one of each kind of Oreos in plastic favor bags

12. Tie closed with ribbon


13. Place on your guest's plate or in a basket near an enterance/exit and enjoy!


These are a great talking piece and your guest will be blown away when they find out you made them yourself! What will blow you away is knowing that rather than paying $250, you paid just about $25!
Now that is what I call "smart party planning!"

Happy Hobbying,

The Self-Proclaimed, Modern Day Renaissance Woman


Monday, April 16, 2012

Orange and Leopard - Freshly Squeezed Fashion From the Wild


Leopard print is a pattern that can literally be paired with just about anything! You can use it to decorate your home and to decorate yourself! For some, decorating a home can be much easier than picking out your wardrobe, but I think picking out your wardrobe is much more fun and, plus, you get a new look everyday!

Treat the leopard print as a neutral. Wear it as you would with any other black, white, or brown piece in your wardrobe! Yes, it has hints of black, but the fashion "faux pas" of black and blue, or black and brown, is out the window...just like its cousin, "no white after Labor Day." When it comes to fashion, anything goes!

 
Celebrities like Khloe Kardashian, Beyonce, and Kate Moss
 made the leopard and red look appear in closets everywhere.

As you may have noticed, bright colors are "all the rage" this season, so why not take a wardrobe staple, like the leopard print and add the latest trend? Right now, I'm loving leopard and orange. It takes a brighter spin on the leopard and red classic look!

So you may be wondering? Where do I start? Well, I always begin my wardrobe selection with the shoe (to put it into household terms, think of your shoes as your hardwood floors, new shag carpet, or bear skin rug...)

Leopard flats are a wardrobe must have. As I mentioned, you can wear them with so many things, but incorporating color is key. You can pair these with orange skinny jeans, or if you aren't feeling daring enough, you can pair with your usual skinny jeans (or wide leg, boot-cut, etc.) and pick up a thin orange belt. This will keep you on the trend, without breaking the bank and without making the committment of purchasing a bold colored pant (but I still suggest you do :P)...Choose a neutral top and a statement necklace in orange to pull the color through.


Even Suri Cruise is rockin' the leopard ballet flats

Leopard too much? Try this Tory Burch reva flat in Habanero Pepper
Tory Burch Reva Flat in Habanero Pepper
Don't be afraid to mix up your wardrobe by treating your staple pieces, such as a shirt, pants, or a dress, as your blank wall, and "painting" yourself with the latest trends with shoes, accessories. You don't want to go overboard with orange or leopard head-to-toe, you want those pieces to be a complimentary focus. Less is more.

When all else fails, remember...If a color combo looks good on your kitchen table or your living room sofa, it will look good on you too!


Happy Hobbying,


The Self-Proclaimed, Modern Day Renaissance Woman


Wednesday, April 11, 2012

Mad About Mason Jars


Like the saying goes, "what's old is new again." This can be applied to many trends even beyond fashion. In today's case, it's all about the mason jar and taking something that was historically used for preserving, well, preserves and jams, and finding new purposes for it! I call it "upcycling." It's the same as recycling, but you are essentially getting an "upgrade" with your new and improved product!

What I love about the mason jar is that the opportunities for creativity are endless! You can use it to solve organization havoc at home or as part of your decor for a rustic, lunch in the country motif.

You will be seeing the "mason" make many cameo appearances throughout my blog, but for today I'm going to show you a fun Spring project that makes you feel good and leaves your home smelling amazing!

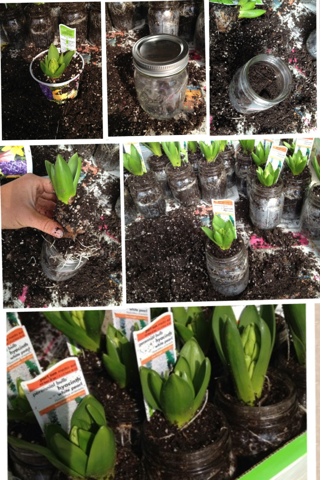
For my sister's bridal shower, I made these as a compliment to the centerpieces, more on the shower decor to come. They are mason jars that I preordered from my local hardware store (much cheaper than a craft store) and used as flower pots! Not only are these cute as a button, but the clear glass allows you to see the roots, which makes this project that much "greener."

In this case, I used hyacinths (mine and my sister's favorite) because they smell amazing, they bloom each year, and they have perfect sized bulbs to fit so comfy inside the jar! You will also need some potting soil and some gardening twine (also found at the hardware store...I think I was the only woman in this store each time I visited :P).

These steps are super easy...see image below.


Wrap those babies with twine to "prettify" and to keep the rustic look prevalent.

These are great for table settings, party favors, hostess gifts, and just for a fun Spring project!

For the shower, we gave the guests a mason jar to take home and 3 days later the pictures and phone calls of the bloomed flowers started coming through at full force! Remember when I mentioned a key to a successful party is to keep your guests remembering what a great time they had? What better way to do this than to give them a flower that they can enjoy for weeks, and in this case, each and every year!

Give it a shot...Martha Stewart would be proud!

j


Happy Hobbying,

The Self Proclaimed, Renaissance Woman


Tuesday, April 10, 2012

Trends for Your Tuesday - The Boat Shoe


The boat shoe was created for, you guessed it, boating, however this spring you will see fashionistas sporting this style from areas around the country that are nowhere near a body of water. A classic and traditional boat shoe has cuts in the rubber soles that create traction and prevent slipping on wet surfaces. Their leather and/or canvas material is intended to repel water, so they are perfect for Chicago's crazy Spring and Summer weather.
The boat shoe, also know as topsiders or deck shoes, has become more of a trend over the past couple years, but it also has a following of loyal wearers that were ahead of the times. My father has been wearing Sperry Top-Siders for as long as I can remember so I always associated them with manly men who work in the yard and are constantly working in an environment where water is plentiful.
When I saw the "topsider trend" pop up on the store displays I immediately grabbed a pair, not only because they are versatile, comfortable, and make me feeling like I'm spending a weekend away in the Hamptons, but because they remind me of my Dad. Plus, seeing how durable they have been for him, I knew I would have them for years!
This is an image of my yellow boat shoes nuzzled in between a pair of my Dads.

Topsiders used to be pretty standard with shades of brown and additional nautical colors of kelly green and navy blue, but if you walk through a department store today, you will see them in neon shades and styles that can appeal to everyone's taste. One of my favorite things about the boat shoe is that although it's currently part of a trend, it truly will never go out of style. My father is a testament to this and I plan to follow in his "footsteps."
So, pick up a neon pair, compliment with contrasting, colored skinny jeans, or white shorts and a striped long-sleeved top and you're ready to rock this look all summer and every summer moving forward!

**Please note, boat shoes are intended to be worn without socks, no matter how many times you have seen Charlie Sheen do it! Do as you please, but remember...you were warned!


Happy Hobbying,


The Self Proclaimed, Modern Day Renaissance Woman

Sunday, April 8, 2012

Hoppy Holidays - An Easy Easter Treat

Happy Easter Everyone! I don't have much time to post today because there are still baskets to open and eggs to be found, however I had a fun and easy treat that I wanted to share with you. My neighbor has been making these for years and I remembered them just in time for today's festivities...

Chocolate Birds Nests!

You'll need to start with the chocolate of your choice. I used semi-sweet and white (2 cups), but you can substitute for dark, belgium, etc and even add peanut butter to the mix. You also need chow mein noodles (1 bag) and jelly beans (1 bag).

Melt your chocolate in a glass bowl in the microwave for thirty second intervals (3 times at medium heat usually dies it), stirring in-between. If chocolate begins to thicken, add a dash of canola, vegetable, or coconut oil and stir thoroughly. Once melted, stir in the noodles until evenly coated. You may also choose to substitute the noodles for pretzel sticks or coconut.
Once mixed, place 'messy' nests on parchment paper.


Add three jelly beans to each nest, let chocolate harden, and voila...you've got yourself some cute and festive birds nests for your Easter/Spring dessert! This is also a great project for kids since there is no baking involved and takes less than 15 minutes to complete. Enjoy!


Happy Hobbying,

The Self Proclaimed, Modern Day Renaissance Woman

Saturday, April 7, 2012

It is All in the Details: Throwing a personalized party

I was up all night trying to decide what to make my first official post about. I wanted it to be something fun and interesting that would show all of you what I'm all about and the types of ideas and projects you will see throughout this blog.

I figured I would start with my latest endeavor and probably one of the most important tasks in my life to date...the pleasure of being the Maid of Honor in my sister's wedding! She's my best friend and has always bent over backwards for me, so I knew I'd have to pulled out all the stops for all the wedding festivities, beginning with the engagement party!

With all parties, it was important for the theme and vibe to reflect the guest(s) of honor. In this case, we were celebrated the commitment of my sister and her fiancé as well as their future as a married couple. My sister and I are half Italian and half Irish, her fiancé is 100% Italian do it was natural for the theme to incorporate the Italian culture, which we know will be traditions that are brought into theist new family!

Now that the history of the event is out in the open, let's get to the good stuff...the details!

Italian...hmmm? Italian engagement? "That's Amore" popped in my head. To get other ideas, it always helps to play around with Google to get creative. After we had the "That's Amore" theme decided we ran with it!

We used I Want a Cake to have this amazing, old world Italian, three-tiered cake made! A cake always make for a good talking piece and the guests always remember it, especially when it tastes so good!

Since one dessert is never enough, we had I Want a Cake bake us some adorable cookies shaped like a bride, groom, diamond ring, Italy, etc. Another talking piece and it made for great pictures.


When I think "Italian", I think "wine", so personalized wine bottles were a must! Anything personalized can tend to get pricey, so this is where you patience and a little elbow grease come into play. I order labels from My Own Labels, which is full of cute ideas for other events such as showers, weddings, garden parties, etc. they have easy to use templates where you can add you own personal touch with the click of a mouse. I headed over to Trader Joe's, where you can find an amazing selection of wine as well as "experts" you can give you recommendations. The prices are right, which was what I needed since I ordered 30 labels and planned to use all if them! 15 bottles if Pinot Noir and 15 bottles of Pinot Grigio!

The purchasing portion of this project was easy, it's the scrapping of the labels that can drive you up the wall (insert patience here), however the final price tag and the look on my sister's face was worth it!


I'm obsessed with anything personalized! There is something so "personal" about it! :) it makes both the guest(s) of honor and the guests feel special. It appears as if you went through a lot of trouble to throw them the best party you could...and in most cases, you did! The best part is everyone wants to take something home, which will continue to remind them what a wonderful event you have thrown.

Then add some personalized candy and snacks, such as Hershey kisses and M&Ms, a signature cocktail and delicious finger foods and your guests will never leave!


Happy Hobbying,


The Self Proclaimed, Modern Day Renaissance Woman

Friday, April 6, 2012

The Modern Day Renaissance Woman

When I Googled "Renaissance Woman", it returned the word "polymath", which Wikipedia defines as,
"a person whose expertise spans a significant number of different subject areas. In less formal terms, a polymath (or polymathic person) may simply be someone who is very knowledgeable. Most ancient scientists were polymaths by today's standards."


When I read further, I came across the "modern day" definition, in which I was most familiar with,
"When someone is called a Renaissance man or woman today, it is meant that they do not have only broad interests or a superficial knowledge of several fields, but rather that their knowledge is profound and often that they also have proficiency or accomplishments in at least some of these fields and in some cases even at a level comparable to the proficiency or the accomplishments of an expert"


I've been described by others as a renaissance woman, so this definition seemed fitting. I get my hands into everything! Whenever I see a challenge, I take it. Anything from gardening to painting the walls in my house to baking to fashion…my projects and interests are endless. I’ve never had any concerns with focus, however everything in my life points to my inability to stay committed to just one project or interest. Variety is the spice of life. Even my meals need to have variety. I describe it as my taste buds going 'crazy'! My career is also a testament to this characteristic. I haven't stayed in one role for more than 2 years. I start to get curious about what’s next and I want to challenge myself further.


Through my blog, I will be giving you a glimpse of some of the projects I've dabbled in, things I want to dabble in, and even things that might be out of my league, but you never know unless you try! Since my mind is always hopping from one idea to the next, I thought, what better way to keep track of it all and share it with everyone than through the art of technology?!?

Happy Hobbying,


The Self Proclaimed, Modern Day Renaissance Woman